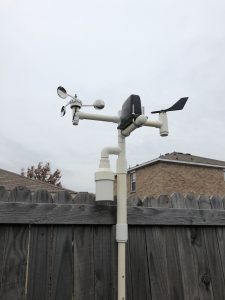
With this post I wanted to do a full overview of my mast, which I’ve spoken some on before. This will provide instructions on how to build as well as archiving things in case I need to rebuild it in the future. (I just had to re-wire everything and it was pretty difficult remember and figuring out where everything went) The mast is only one part of my weather station; the enclosure, which houses some other sensors as well as the RPi, will be in another post. The way my weather station works is the mast gathers info from the 5 sensors that are contained on/in it via the micro controller. It then sends the data to the Raspberry Pi that resides in the enclosure via I2C to be archived, along with data from the other sensors, within my database tables.
The mast is built out of PVC. This allows me to attach my homemade sensors easily as well as protecting the micro controller that resides inside that runs the sensors.

Main Mast Build:
Most of the mast is made from 1″ PVC with different connectors and such. There are a few places in which the 1″ is not used, for example, where the micro controller resides. (You can see it as the larger section). It uses 3/4″ PVC inside 1.5″ PVC. It is built this way to provide some waterproofing for the micro controller. The other section is for the temperature & humidity sensors. It uses some 3″ PVC as a sun shield for the sensors. As for the wiring of the sensors, I will detail that a little later, but all the wiring for the sensors comes together at a point where the larger section starts. It’s there where I “harness” everything together and will detail that later.
Sensors:
As I said, there are 5 sensors within the mast. 3 are sensors I have built myself and two are not. For the sensors I have built myself, I have linked to the posts in which I detail how to build them.
- Wind Vane – Link to post
- Anemometer – Link to post
- Rain Gauge – Link to post
- Temp Sensor – Link to post
- Humidity Sensor – Link to post
Microcontroller & Wiring:
In previous versions of the mast, I have used an Adafruit Trinket board, but when I attempted to add some additional sensors (which failed miserably due to waterproofing) it didn’t have the needed pins required, so I switched to a Arduino Pro Mini 3V. The Pro Mini is slightly larger, more powerful and allows me to power it with 5V coming from the Raspberry Pi.
As I said before, I communicate with the Pro Mini from the RPi via I2C. To do this, I have a cat 5 cable running from the enclosure to the Pro Mini (I only need 4 of the wires, but it’s nice to have a spare 4 in case something happens) and then another piece of cat 5 that runs from the Pro Mini to the wiring harness. I’ll make another post regarding the wiring for the micro controller and the wiring harness as I believe this one has gotten a little long. Link to post
Stay tuned for more…
3 comments
Comment by Dave on December 7, 2020 at 2:06 am
Joe, I’m on the same path as you regarding the weather station. I’ve got the code ‘good enough’ for a 1.0 and I’m ordering a PCB this week. Here’s what I’ve been doing that may address a couple of your issues:
I’m using a Teensy 3.2 – Lots more pins. I’m running it at 24mhz and my 6600mah battery lasts about three days without a charge.
I’m using XBees to communicate from the Teensy to the RPi. These things do drain power, so I have the Teensy shut the XBee down unless it’s doing its 20 minute update (5 minutes if it’s raining).
I also use the large Adafruit solar panel for charging and it works pretty great.
I still need to find an appropriate box to put all this in, but the waterproof case at Adafruit looks promising.
Comment by Dave on December 7, 2020 at 1:46 pm
And I just realized that I don’t know what year you posted this… 🙂
Comment by Joe on February 11, 2021 at 8:37 pm
Hey Dave! I’ve actually gotten away from solar power because it just wouldn’t last long. I upgraded the battery to a 12k mah battery and it just wouldn’t last long even using the largest adafruit solar panel. I now have an extension cord running across my backyard to power it as I’ve kind of put it all on the back burner for now.